Tuesday, September 25, 2012
Candy Jar
While you're here, I would like to share with you one of the very few projects I was able to work on and finish this summer. I was hauling this beauty to the car from a garage sale and my husband asked why I bought something that was scratched up, falling apart, and not worth the $$. You would think that after 17 years he would just get used to it and not question but sometimes it takes him awhile!!!

The price tag was $5 but as I was sitting it down on the table, one of the plastic inside pieces to a lid broke so she came down to $3.

It is pretty scratched up but a good, sturdy piece of wood.

Well thank goodness she came down on the price because as I was working on 2 of the lids, their plastic inside pieces broke as well. Bummer! So I had one good lid, lol. But that's okay. As often as people are in the jars, lids would just be in the way anyway. Here it is finished:

After I sanded the piece down slightly, I painted it one coat of red. Then 3 coats of black. I finished it off with ebony Briwax with steel wool and it distressed the piece for me as I went along. I wanted this piece to mainly be black with just a little bit of red which is why I only did one coat of red to 3 coats of black.

This lid is actually not on it anymore. I put it up in case I come across some more just like it sometime. I think it makes for a nice candy holder.

I bought the plastic icicle ornaments in the after Christmas sales. They come in a box of 24 with a gold string. I cut off the gold string and dipped them in the wax. You can see the before pile in this picture, then the after with a wax dip and rolled in cinnamon.

If you want details on my waxing process, you can visit a past post I did here on grunging candles. So after they are dipped in wax, rolled in cinnamon... I dip them in wax one more time and then give them a little cinnamon rub to look like this...

To keep the hanging hole clear of wax, I use this antique ice pick.

I like for my wax to cure for a few days, even up to a week. I love the patina after a waxed piece has set up. It's always a rich, beautiful deep brown color.
One of my best friends is a Stampin' Up Demonstrator so I'm always ordering from her. I recently bought their baker's twine and I love it! You get 25 yards for $2.95.

So of course, I had to have a nifty little holder for it once I had it tea dyed. Dollar Tree has these awesome, heavy glass sugar shaker jars for one buck! Perfect!

Cherry Cobbler...

Early Espresso...

I wanted to share with you another makeover I squeezed in earlier this month. I bought this unfinished wood tote many years ago at Hobby Lobby. It was painted green from when I went through my hunter green/burgundy stage in the early 90's. Anyone else go through those colors, hehe?

I sanded it down just a tad bit, leaving most of the green. Then I painted it mustard with a black overcoat. From there, I just applied ebony Bri-wax with steel wool and as usual... the combo sanded it down for me while applying a beautiful patina! In a few spots you can actually see the green and I really like that.

Here is the finished tote sitting on my kitchen counter. It's filled with a hodge podge of treasures I found while out antiquing this spring and summer... except for the Lord's Prayer plaque which I've had for years.

I've been wanting some glass containers for tea bags and kool-aid packets. Found these at an antique mall for regularly $9 for both. They were on sale for $4.50 for both so I grabbed them up!

I sanded the lids down a bit and painted them with a barn red acrylic paint. Then I topped it with a couple coats of black. When it was dry, I used ebony Bri-Wax to finish it off. One of my favorite features about using the Bri-Wax with steel wool is that it automatically sands the piece for you. So I sanded, antiqued, and sealed it all in one step! Gotta love that!

Perfect! Just what I wanted...

Another little project I finished...
I didn't get a before picture of my unfinished, hand-carved wooden bowl I brought home from Mexico last year but here it is in a picture with some other goodies that came home with me.

It was very porous so I sealed it with a spray sealer. I use and love Rust-oleum's American Accents clear top coat in matte. It's $4.99 at Hobby Lobby but I always wait for the 40% off coupon they have every other week and it's a little bit nicer price. All I did was paint this with black acrylic paint because I wanted the wood and not a color to show through. Again, finished it off the ebony Bri-wax and steel wool to sand, antique, and seal it.


Not only do I love the way this turned out... but I really LOVE the way it looks with Sarah from All Roads Lead Home's fantastic salt dough bowl fillers!

Isn't that a lovely display? Let me tell you, it looks wonderful in my patriotic living room! Go visit Sarah at All Roads Lead Home and see the rest of her fabulous salt dough bowl fillers... much talent that girl has!

Well I waxed some plastic fruit for the first time. Not what I envisioned, but I think they turned out okay. I'm happy with them. I use the same method that I use when grunging my candles. First, I started off with the bags of plastic fruit from Hobby Lobby. $5.99, on sale half price for $2.99. A bag of 16 pears and a bag of 16 apples equals out to 19 cents for each piece of fruit so if it doesn't work out, I'm not out much money. I also bought 3 pineapples at the Dollar Tree but they are still a work in progress.

I didn't have coffee grounds so I added some coarse pepper to the wax pot. Yep, pepper. Honestly, it worked out great. I used old Scentsy wax. It was so strong that you couldn't even smell the pepper, haha! See the texture forming?

I was impatient and just threw them on the mat as they came out of the wax like I do my candles. But guess what... you have this when you do that...

So, after scraping that off, I threw them in the wax again for a second coat. I tried just throwing them in the wax like they are, but the bump was still there. They were still warm so it was easy to scrape it off. Then they went for a cinnamon/nutmeg mix bath.

Side note: I bought this 6.5 oz jar of cinnamon at the Dollar Tree! That was exciting, now I don't have to dip into my cooking stash.

Look at the pears, aren't they so cute? The fruit covers well and the texture looks great on them!

Two wax dips.
Spice dip.
Another wax dip.
Another spice dip.
One last wax dip.
Once they slightly cooled, I didn't dip them but lightly rubbed the spice mixture on them.

Here's how the pears turned out.

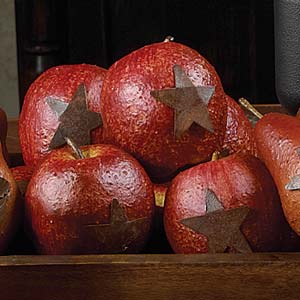
The flash made the apples look so much more red than they are. They are actually more brown than that.

See the cute little rusty star on the one apple? Well, the whole inspiration for waxed fruit came from the Early Spring '11 issue of The Country House. I borrowed this picture from their website, aren't these just the cutest?
Yours for only $15.99 for a set of 4. Not a bad price, but my Dave Ramsey budget doesn't allow it. So I dug out these sets of rusty star and heart garland that I bought at Hobby Lobby after Christmas at 80% off. For 40 cents a package, I got quite a few little stars and hearts once I used my wire cutters and snipped the wire off each one.

I had a tough time getting my stars to bend just perfectly around the apples. Then I pulled up their picture on the website to get a closer look and their stars aren't on tight. I really like the brown colors of my fruit but the rusty star just blends in too much so I painted it black. I think I am going to just put black stars on the larger fruits and leave the smaller ones alone.

Since the kids were out of school for the week before Christmas, I knew this project would be a fun one for all of us instead of a headache just for me.

Robbie rolling out the dough

We have a cookie tree kit that came with ten different sizes of stars. You cut out 2 of each size. Let me tell you , those big stars are hard to come up in one piece. Well actually, they didn't haha! We had to piece them back together on the baking sheet. But they healed beautifully in the oven .

I normally use buttercream icing on this but I really love the powdered sugar icing for sugar cookies so we went with that instead and I'm so glad, it was delicious! Start with the biggest cookie, ice it, set it on the platter with a dollop of icing under it to keep it from sliding. I use a cake board covered in Christmas tissue paper.

Next is the other star the same size. Ice it and set it where it lays with its points between the points of the other star. Follow this pattern all the way to the smallest star. Save one of the smallest stars for the tree-top star. This icing hardens faster than the buttercream icing so we had to put sprinkles on it as we went up. Rich said the guys from work loved it and was even taking pictures of it. One of them even texted me to thank me and said it was beautiful and tasted great.
Amariah self appointed herself as the photographer. She had to see how many neat angles of the cookie tree she could get.


I really like this angle a lot. It makes the cookies look so thick but airy and oh so delicious!

I just wanted to share with you my grunging process. I started out with a white pillar candle I got at a garage sale for 50 cents. I put it in my makeshift double boiler that is a gallon food tin and a stock pot I bought at a garage sale to use this way and also for when I tea dye.

Then I took all the little tea lights out of their metal casings and took out the wicks. I bought a bunch of boxes at Dollar Tree in the half price bin. I didn't care too much about the scent because the cinnamon and spices are so strong, it covers it anyway.

I also had a bright red half pillar candle that the wick was messed up on, so I put that in the pot too. As it melted down, I pulled the wick right out of it. In my experience, the color of the candle doesn't matter so much because the wax is a transparent color when you melt it down, it is not opaque like the candle. I don't use paraffin wax or store bought candle making wax. I am always on the lookout for cheap, broken, clearance candles. After the holiday sales are the best time to get candles when color and size doesn't matter. I put them all in a box to store them, then pull them out to grunge or melt when I have a good supply. Next time I grunge, I'm going to add vanilla to the pot, I forgot to do that this time.
I bought 6 boxes of these 6-count of 5" emergency candles at the Dollar Tree. They are the perfect size for most candle holders. I cut the wicks off because I don't want sparks from the spices. I know some people don't do this but I just want to be careful. So mine are just for looks instead of burning. It's easier to cut the wick after they've been dipped a few times.

Then the real fun (and mess) begins!

I mix cinnamon and nutmeg in a bowl. I immerse the candle in the wax for about 10 seconds then pull it out with metal tongs. Then I roll the candle in the bowl. I'm always stocking up on those latex household gloves when Walgreen's has a coupon 3/1.00 or 2/1.00. I use those and throw them away when I'm done. The tongs leave marks in the candle, but after I roll the candle in the mixture, I rub it between my gloved hands lightly so it pushes the cinnamon onto the candle and evens out the tong marks. I do 3-4 at a time, let them cool after each dip then repeat this over and over again until I get the thickness I want and the candle is completely covered. Some people end with a dip in the wax. I end with a dip in the mixture because I think it's more grungy that way. But the best thing about that is you can see it both ways and decide which way you like better.

The bigger (pillar) candles I actually had to use my gloved hand to roll it around in the hot wax. It was warm and the glove was covered in wax but it wasn't hot enough to burn me. I just use my scraper on the glove and scrape it back into the hot wax. Same thing with the wax build up on the metal tongs.

The hardest for me was the battery operated tea lights because I had never grungied those before. I finally learned that I just had to cake it on with the spreader. A little wasn't cutting it and it can't be thrown in the pot. I'm glad I saved these for last because what I finally did was let the wax cool slightly and then spread it on like icing. After a roll in the mixture, they turned out pretty good I thought.
Quite messy, yes indeed! Rich asked me if I realized what a mess I was making. Hehe! I wish I had an after clean-up picture. I had to scrape a little wax off the counter top and the stove top but it all worked out great. I was afraid I was going to scratch the ceramic stove top, but I didn't. Can't even tell that big mess was once there!
Edit 02/11: I just wanted to add that I put my burner on med-high to melt the wax. When it melts down, I put the burner on as low as it will possibly go for two reasons. This keeps the spices from melting off. The candle also dries quicker which keeps it from having too many drips hanging off of it. It is then not too hot for me to rub in the drips.
Also, if you'll read through the comments, you will get lots more great suggestions! Lots of women use crock pots for their waxing because it's less of a mess they say. I say, whatever works best for you and the easiest is the way to go.
Wax is so forgiving... if you mess up, just stick it in the melted wax again and give it another shot.
I’m so glad I discovered Briwax!

It’s now my new addiction! Do you remember the small bowls I got at the thrift store? This is what they looked like when I brought them home.

After sealing them, I painted them with Folk Art’s English Mustard, Apple Spice, and Pebblebrook paint.

I finally found some Ebony Briwax and went to town on these bowls. That stuff is amazing! I really love the nice sheen finish that it gives. It reminds me of an old antique patina… so lovely! Once you buff the Briwax, you are done. No spray sealing. No holding out till it’s dry. It’s dry to the touch and ready to go. Love it!


Here’s the little mustard one by itself. I just think it’s so cute now!

If you've not tried this product, I strongly recommend you try it now!
Today's finished project is this utensil holder:

My supplies: a roll of clearance wallpaper border that I bought at Lowe's for under 5 bucks, a wine cooler crock that I bought for 60 cents. We used these crocks at Hobby Lobby in the floral dept. to store floral stems. They were unsightly, so the company finally made new floral counters with matching containers. When they did, they clearanced out all the crocks. I bought 5 of them and finally finished one.


I made a circle of masking tape inside the crock about an inch down and then painted around the top and bottom of the crock with Barn Red. I cut the images I wanted to use from the wallpaper border. Gotta love Mod Podge, right? I put some of it on the back of the image to use it as a glue. Once I glued them all in place, I went over the whole thing with Mod Podge again to seal it. It was really rough and I being the perfectionist I am was getting frustrated with the tapering of the crock. I finally decided it was o-k-a-y if it wasn't perfect! Lol! So towards the bottom of the crock, the border is overlapping. When it is displayed on my kitchen counter, you can't even tell.


